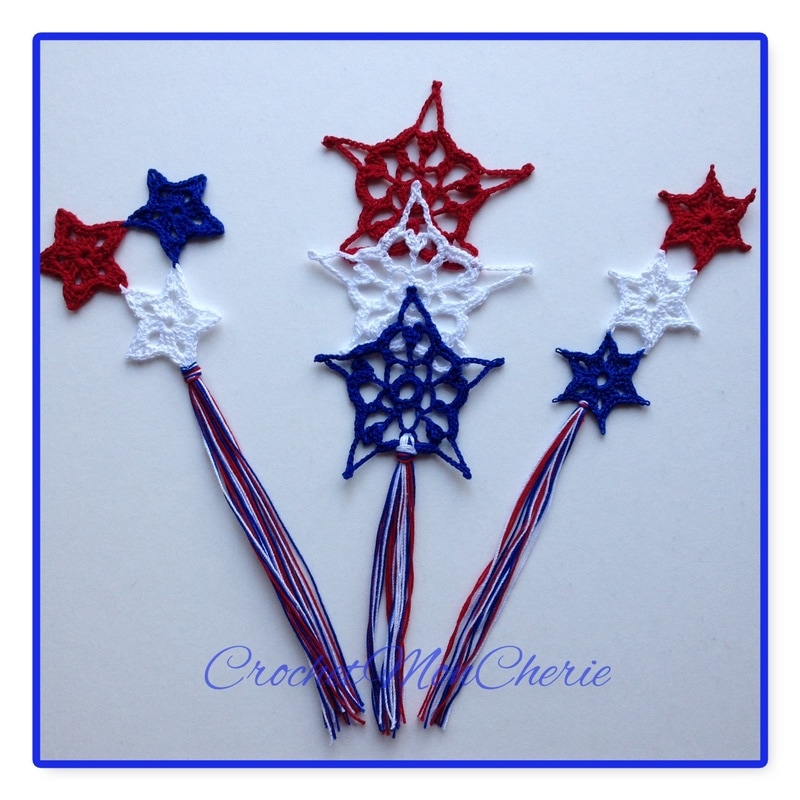
 SHOOTING STARS BOOKMARK #3
(6 pointed starts) Difficulty Level: Easy Gauge: One complete star is 1.5 inches Project Dimensions: 4.5 inches long by 1.5 inches wide (Not including tassel) Materials Needed: • # 10 Cotton Crochet Thread • 1.5 mm Crochet Hook • Fabric Stiffener Or Starch Project Instructions: Note: Join with sl st in first stitch of a round unless otherwise stated. Special Stitch: Picot: ch 3, sl st in first ch Picot Join: ch 1, sl st to desired point of previous star, ch 1, sl st in first ch. FIRST STAR: With red: Ch5, sl st join to form ring. Round1: ch 3, 1hdc, 1dc, ch4, (1dc, 1hdc, 1dc, ch4) five times, sl st to third ch of beginning ch3. Round 2: ch 1, 1sc in each of next two sts, [(2sc, picot, 2sc )in ch-4-space, 1sc in each of next 3 sts, ] five times, (2sc, picot, 2sc )in ch-4-space, sl st in first ch and first sc. Finish off. SECOND STAR: With white: Ch5, sl st join to form ring. Round1: working in ring: ch 3, 1hdc, 1dc, ch4, (1dc, 1hdc, 1dc, ch4) five times, sl st to third ch of beginning ch3. Round 2: ch 1, 1sc in each of next two sts, [(2sc, picot, 2sc )in ch-4-space, 1sc in each of next 3 sts, ] four times, (2sc, picot join, 2sc )in ch-4-space, 1sc in each of next 3 sts, (2sc, picot join, 2sc )in ch-4-space, sl st in first ch and first sc. Finish off. THIRD STAR: Repeat second star with blue yarn. Finishing: Add tassel of 6 strands, (12 inches each.) to middle sc on bottom of last star. Trim ends if needed. Block/shape and stiffen. Copyright CrochetMonCherie 2016
0 Comments
Around the web there are a number of free can cozy pattern. But when trying to pick out the perfect one for a Father's Day gift, I just wasn't in love with any of the options. So, I headed to my design space, picked out some scrap colors I knew my man would like, and came up with the pattern. I worked it so that the pattern is intentionally inside-out, filled with tight stitches so you can't see through the crochet (a problem I noticed with many of the existing can cozy patterns), and a stripe of color that is worked on the surface of the cozy. Make one as a gift, or make a whole set. Vary the stripe color on each can cozy and you'll have the perfect way to tell each persons soda apart ;) The free version is below, and if you prefer an ad-free, PDF version, it is available on RAVELRY. Happy Crocheting, Cherie  Inside Out Ridges Can Cozy
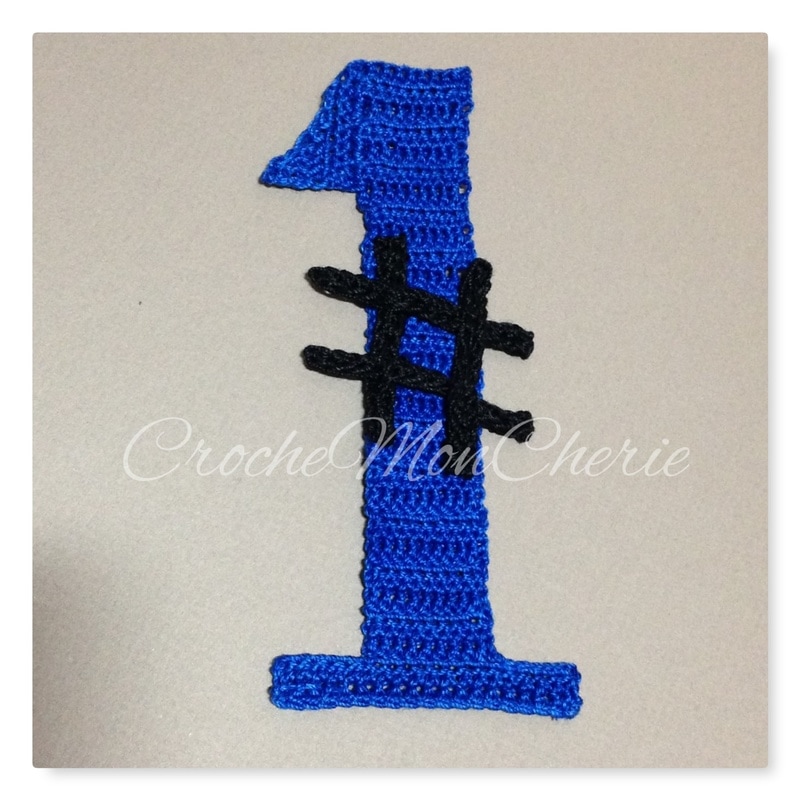
Number (#) symbol:
Make four of the following: 1. Ch 15, hdc in second ch from hook and in each st across. Finish off. 2. Sew together with matching thread in a #position. See images for help with placement. Blue Number One: *NOTE: all stitches worked in back loop only Foundation Row: Ch 20, hdc in second ch from hook and in each st across.ch 2. Turn. Row 1: hdc in same st and in every st across. Ch1, turn. Row 2: sl st in next 5 sts, ch 2, hdc in next 9 sts. Ch 2, turn. Row 3: hdc in each st across, ch 2, turn. Repeat row3, working in back loops only, until work measures approximately 5 inches. Then continue with row 4. Row 4: rotate 90 degrees clockwise so that you are working on the left edge of project: sc around last st of next nine rows, ch 2 (counts as hdc), turn. Row 5: hdc in same st and in each of next 8 sts, slst in next st. Ch 1, turn. (10 sts) Row 6: skip first slst, slst in next 2sts, sc in next st, hdc in next st, dc in each of next 2 sts, tr in each of next 2 sts. Finish off. Sew the # sign to the top of the number one. Use images as references for placement. Father's Day will be here before you know it and men are notoriously hard to buy gifts for. No one really wants to gift another tie, dress shirt, or silly socks. So lets make this Father's day unique. Lets fill it with handmade items that Dad's, husbands, and every man in your life would actually love to receive. Over the next five weeks I will release 5 guy-friendly crochet patterns that are easy to make and even easier to love. To get it started, I am releasing this quick Cord Organizer crochet pattern for free. If you like it, please leave me a quick note on Facebook, post it on Pinterest, or tag me with your finished project on Instagram, #CrochetMonCherie. I love to see what my fellow crocheters make!!
Pattern:
Foundation Row: Ch 8. Row 1: Sc in second ch from hook and in each st across. (7 scs) Row 2: Turn, Ch1, sc in FLO (front loop only) of each st across. Row 3: Turn, Ch1, sc in BLO (back loop only) of each st across. Rows 4-9: Repeat rows 2 and 3 consecutively. (work more repeats if you want a larger cord organizer) Row 10: Repeat row 2. Row 11: Turn, Ch1, sc in BLO of first two sts, ch3, skip 3 sts, sc in BLO of last two sts. Row 12: Turn, Ch1, sc in BLO of each sc and ch across. Row 13: Repeat row 2. Before finishing off, sc evenly around all sides of project. (One sc in each st/row and 3sc in each corner.) Finish off. Weave in ends. Block. Lightly starch if desired. Sew button on right side at approximately row 2 or 3. Wrap a new pair of earbuds in your Cord Organizer and get ready for gifting! |
Archives
March 2018
Categories
All
|


 RSS Feed
